
Crochet Horse Bonnet Pattern
- dawnesdesigns1
- Aug 18, 2025
- 5 min read
Updated: Sep 8, 2025
There are five parts to a crocheted horse bonnet; poll, forelock, browband, length, and ears. The first four (poll, forelock, browband, and length) are all crocheted. The ears are generally cut from fabric and sewn on the crocheted bonnet.
If you are looking for a bonnet that is a custom fit, check out how to measure for a custom bonnet here. Otherwise, this bonnet pattern will use measurements taken from a 16hh horse.
Gathering Materials
Acrylic Yarn, weight 4, 1 skein (It’s best to use yarn that has a low pill).
Crochet Hook - 5mm
Scissors
Paper
Pen
Sewing Machine or Thread & Needle if you hand sew!
Fabric of your choice (I like Jersey/Knit)
Terms
Single Crochet = sc
Chain = ch
Stitch(es) = st(s)
Single Crochet Decrease = sdc
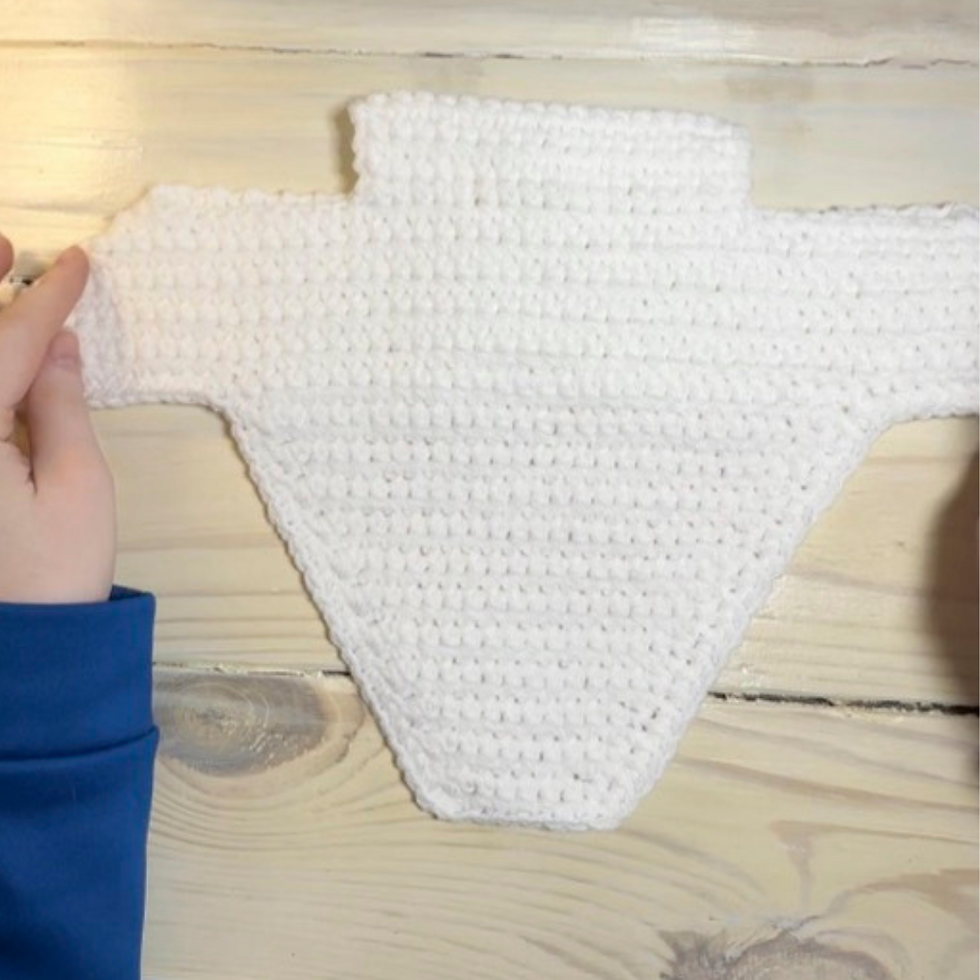
Poll
This is the piece that goes behind the horse’s ears & underneath the bridle.

Row 1: Ch 10, turn.
Row 2-46: Ch 1, Sc beginning in the 2nd ch from hook, turn.(9)
Fasten off.
NOTES: I found it easier if I take measurements from a mount to not count rows, but instead create a paper template and keep my crocheted poll within that paper template.
Forelock
The forelock refers to the space between the ears. To start the forelock, fold the ends of the poll just created in towards the center.

The forelock will begin on the back edge of the poll piece.
Row 1: Start in the right corner of the fold and sc in the next 18 sts. Ch 1, turn.
Row 2-10: Sc in 2nd st from hook and in every ch after. Ch 1, turn.
Fasten off.
NOTES: The reason why it’s important to fold the poll piece inward until the ends meet in the center, is to make sure everything is symmetrical when starting the forelock. The amount of stitches and rows can be adjusted according to your horse.
Again, if you are making a custom size, I suggest cutting a piece of paper the size you need as a guide.
Browband
As the name refers, this is the portion of the bonnet that sits under the browband of the bridle and connects the edges of the poll and the forelock together.

Row 1: Start on the right edge of the poll piece and sc in each st, when at the end of the poll piece, ch 10. Sc in each st in the forelock piece, when at the end of the forelock piece, ch 10 and continue on to the left side of the poll piece. Ch 1, turn.
Row 2 - 10: Sc in each st. Ch 1, turn.
Cut and tie off the end.
NOTES: Not every horse has the same width sized browband, but a safe bet is between 3 & 4 inches for most horses. You can also adjust the amount of space given for the ears by removing or adding a chain.
Length
“Length” is the triangle portion of the bonnet that extends down past the browband towards the caveson.

Row 1: Count 13 sts in on the browband. Sc in the next 28 sts. Ch 1, turn.
Row 2 - 22: Sc in each st stopping 3 sts from the end, sdc, sc in last st. Ch 1, turn. (This will give the bonnet its signature gradual tapered edge while keeping it from curling on you).
Edging: Continue sc in each row/st around the bo
nnet to give it a finished look.
NOTES: Check out where my fingers are pointing. The length of the bonnet always begins and ends at the center of each ear, giving a nice contour around the horse’s eye.
While I crochet to 22 rows, you can continue all the way until there is only 1 stitch left, or stop sooner depending on what type of look you want.
At this point you can add embellishments such as jewels, piping, or rope.
Ears
The ears are typically cut and sewn, then attached to the crocheted bonnet. You will need a plain piece of paper, a pen, and scissors.
Cutting the Template
Along the bottom edge of the paper, measure 4 inches and make a mark with your pen.
Moving along up the edge, measure 8.5 inches and mark it with your pen.
In an arching fashion, connect the two marks.
Cut out the template.
You will want to fold the fabric you use for the ears in half and place the edge of the pattern against the edge fold of the fabric when cutting. Cut two ears out.

Custom Measurements:
Take the measurements and transfer them onto paper to create a template.
Divide the circumference that you measured for the base of the ear by 2 and add ½ inch for a seam. Measure this distance along the bottom edge of the paper and make a mark.
Next, take the measurement from the base of the ear to the tip and make a mark on the side of the paper.
In an arching fashion, connect the two marks you made, then cut.
The template should look like a right triangle with a curved hypotenuse.
Sewing

Now that we have the fabric all cut, it’s time to get sewing! You can use a sewing machine or sew by hand.
Fold fabric with the right sides facing each other and sew with a ¼ inch seam allowance along the curved edge.
Flip right side out.
NOTES: I found it easiest to use jersey or knit fabrics as they are forgiving with errors and tend to look quite nice on the horse’s ears. It’s best to stay away from heavy fabrics that could rub the horse’s ears like denim or canvas.
Sewing Ears to the Bonnet
Grab the bonnet! It’s time to get the ears in place.

Start from the inside of the bonnet (what lays against the horse) and pull the sewed ear up through the ear hole to the outside (what everyone else will see), and align the sewn seam to the outside of the ear hole. Make sure to keep ½ inch allowance of the fabric ear on the inside of the bonnet.
Pin the ear hole to the fabric. I would recommend pinning the seam area first, then pinning the second opposite of the first pin. Place a few more pins to hold the fabric in place.

Once the ear is pinned, flip only the crocheted portion of the bonnet over sew the crocheted bonnet and ear together. If you are using a machine, your bobbin thread will act as the “top thread”. Make sure to keep your bonnet from bunching up in the machine (TIP, use wax paper against crocheted materials for a smooth sewn line)! If you’re hand-sewing it in, be sure to keep the ear straight and taught to prevent it from bunching up.
Repeat for the other ear making sure to mirror the seam for a symmetrical look.

YOU DID IT!
You have just created your very own custom bonnet!
Once you have the pattern down, these bonnets are easy and fast to make. Play with colors, types of crochet stitches, embellishments, and even textures of fabrics. The sky's the limit. Enjoy!


Comments